
Embroidery, The Wizard of Oz

The Wizard of Oz embroidery!
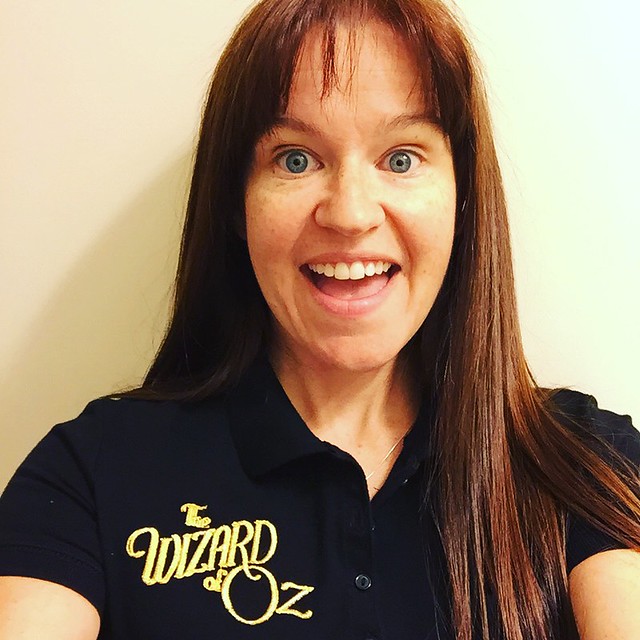
I have been on a Wizard of Oz kick lately. I am working with a fellow teacher on setting up a successful show for our students. A lot goes into a show and instead of kicking and screaming it is best just to embrace it and fall head over heels. I searched high and low for the perfect embroidery design for our show, The Wizard of Oz. I wanted only the title so I could place it on the lapel of any polo shirt. We will have t-shirts made too, but I wanted polos shirts for the adults who help. This design is from EmbroideryDesigns.com.
It worked perfectly! It is a little dense, so I used Pellon 808 craft fuse for my stabilizer. I didn't want the stitches to move around and get all yucky. If you do use craft fuse, remember to leave the fuse side facing up when embroidering the design.
Now I just need to find a pair of ruby red slippers. Any suggestions on where to find them?

Comments

Ginger said…
Shoes for you? If so and if you wear Keds type shoes, you could probably paint a white pair sparkling red.
Sew Spoiled said…
Yes shoes for me. I am the crazy teacher that really gets into my work. Keds! That is a great idea!!! Then, they will be comfortable too!

Popular posts from this blog

Fun in the Sun Mermaid Tutorial

Sewing Materials: 1/4 yard of Lycra or  5T or larger old swimsuit Thread Stretch Needle (helps) Sewing Machine and Sewing Notions Print the PDF patterns pieces out and tape them together. ✄✄✄✄✄✄✄✄✄✄✄ ✄✄✄✄ ✄✄ Step 1: Cutting Layout-  Place the templates over the fabric and cut. ✄✄✄✄✄✄✄✄✄✄✄ ✄✄✄✄ ✄✄ Step 2:   Fold the top edges of the mermaid tail and sew across. ✄✄✄✄✄✄✄✄✄✄✄ ✄✄✄✄ ✄✄ Step 3: Place the mermaid tale pieces right sides together. Sew around the mermaid tail using the stretch stitch, it looks like a bolt of lighting. ✄✄✄✄✄✄✄✄✄✄✄ ✄✄✄✄ ✄✄ Step 4: Flip the mermaid tail right side out using a chopstick.   Option: You can add Poly-fil to make the end of the tale puffy.   Set aside. ✄✄✄✄✄✄✄✄✄✄✄ ✄✄✄✄ ✄✄ Bodice   Step 1: Cut a bodice measuring  4.5” X1.5” or use template. ✄✄✄✄✄✄✄✄✄✄✄ ✄✄✄✄ ✄✄ Step 2: Fold the bodice right sides together and sew the  short ends making a loop. Use the edge of the presser foot for your seam a

How to Line an A-Line Skirt Tutorial

 After you find an A-line skirt pattern , I am using  One Yard Wonders 101  template . Make a muslin of your skirt! It only takes a few minutes to make a muslin version. Just baste stitch the side seams and make adjustments for your hips. Once your template is right you can make all the skirts your heart desires, so it is important to get the perfect fit first. Now we are ready to cut the "good" fabric and sew! ---------------------------------- ---------------------------------- ---------------------------------- ---------------------------------- Flip the skirt right side out and put it on!! You are done!! It is super easy and your new skirt will look store made.  Plus there is no hand stitching the lining to the main fabric. If you have any questions please comment below or email me at leah.sewspoiled@gmail.com .  WooHooo!! A-Line Skirt Pattern Finds

Sweet Coin Purse Tutorial for Teacher Gifts

This time of year is so special to me because I get to show my gratitude for all of the hard work that goes into teaching my daughters. I love to make handmade gifts and this year is no exception. Since money does not grow on trees around here, I looked at my stash (I keep my scraps in hat boxes ) and tried to see what I had a lot of; small zippers, trims, Peltex strips ( from making iPad cases ), fabric scraps and some hardware for key fobs. So I set to work.  Materials: Plastic multipurpose 5" Zipper  Fabric Scraps Lightweight interfacing 808 Pellon Trims (We clipped  key fobs  with 1.5" swivel hooks onto our coin purses . There are tons of tutorials on making key fobs .) Step 1: Print out the Coin Purse Template  PDF.  Cut 2 main fabric, cut 2 lining and 2 interfacing using the template.  Optional: Cut a 2"X2" square of your choice main fabric or lining. This strip of fabric is used to clip a key fob to your coin purse later. We used a 1.5